
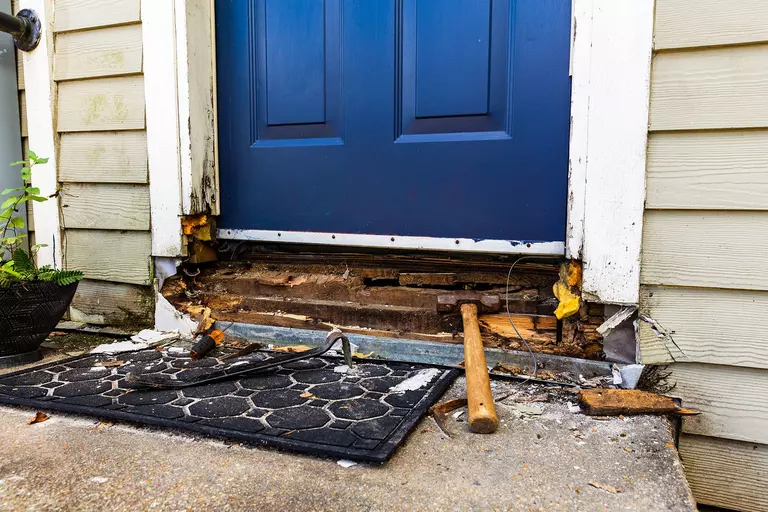

Exterior door thresholds endure a punishing combination of environmental exposure and mechanical abuse. While window flashings only have to contend with gravity and wind-driven rain, door thresholds face those same forces alongside the relentless impact of foot traffic, moving furniture, and pets. Worse yet, because doors sit at floor level, any water that circumvents the exterior seal does not merely discolor a drywall reveal; it drips directly onto the subfloor, migrates into the rim joist, and pools on the foundation mudsill.
By the time an interior wood floor begins to cup or a basement ceiling develops water stains beneath an entryway, the structural framing has usually been rotting in silence for years. Rebuilding that subfloor assembly is an expensive, intrusive repair that can easily cost thousands of dollars.
Preventing this catastrophic failure requires abandoning the idea that a bead of exterior caulk provides adequate protection. Long-term weatherproofing demands a continuous, redundant drainage system that assumes water will eventually penetrate the exterior boundary and provides a foolproof path for that water to escape harmlessly back outside.
The Flaw of Relying on Sealant Alone
The most pervasive mistake made during door installation is treating elastomeric caulk as the primary waterproofing barrier. Installers often set an exterior door frame directly onto a flat wood subfloor, run a line of polyurethane or silicone sealant along the outer edge, and move on to installing the exterior casing.
This approach fails because exterior door assemblies are constantly in motion. Every time someone steps on the threshold, the metal or composite extrusion flexes slightly underfoot. Combine that daily deflection with the seasonal expansion and contraction of wood framing, temperature extremes, and ultraviolet exposure, and even the highest-grade polyurethane sealant will tear, pull away, or crack within a few seasons.
Once the sealant bond breaks, wind-driven moisture is pulled directly beneath the threshold through capillary action. The flat subfloor beneath holds that moisture like a sponge, shielded from air movement and unable to dry. A proper waterproofing system never relies on a chemical bond to block water; it relies on gravity, positive slope, and overlapping flashing layers.
Preparing the Rough Opening with a Sloped Sill
A truly watertight installation starts with the rough framing before a single piece of flashing membrane is rolled out. If you install a door threshold over a perfectly flat or backward-sloping rough sill, any water that slips behind the exterior trim will pool against the interior flooring.
Begin by inspecting the rough opening. The subfloor across the opening must be structurally sound, dry, flat from side to side, and clear of any drywall dust or protruding framing nails.
To ensure continuous drainage, you should always create a positive outward slope across the sill:
- Install a manufactured sloped sill wedge or rip a piece of rot-resistant cedar beveled siding to the exact width of your wall framing.
- Fasten the wedge across the rough sill with the thick edge facing toward the interior of the house and the thin edge flush with the exterior sheathing.
- Aim for a gentle slope of roughly one-quarter inch per foot toward the outside.
This subtle grade guarantees that any moisture that bypasses the outer door sweep or threshold gaskets hits a surface that immediately rolls water away from the living space and out to the exterior drainage plane.
Constructing a High-Performance Sill Pan
The sill pan is the single most critical defense against rot. Think of a sill pan as an impervious, three-sided waterproof tray that lines the bottom of the rough opening and extends several inches up the sides of the framing. If moisture gets past the threshold, it is caught in the pan and directed back outside before it can touch bare wood.
You can purchase three-piece rigid PVC or composite sill pans that slide together and glue at the seams, or you can build a custom, seamless pan on site using flexible, self-adhering flashing membrane.
Detailing the Back Dam and End Dams
If you are fabricating a sill pan with self-adhering flashing, the choice of material matters. Standard asphalt-based flashing tapes lose their bond in high-heat conditions and become brittle in freezing temperatures. Instead, use a butyl-based or advanced acrylic flexible membrane that can stretch around corners without tearing or requiring razor cuts.
A functioning sill pan must incorporate two critical features:
- The Back Dam: Fasten a three-eighths-inch wooden dowel or a strip of solid composite trim along the interior edge of the rough sill before applying the membrane. When you roll the flashing tape up and over this lip, it creates a physical barrier that prevents wind-blown water from rolling across the subfloor into the room.
- The End Dams: The flashing membrane must wrap up the left and right trimmer studs (jack studs) at least two to four inches. These vertical turn-ups ensure that water driven against the door jambs cannot seep into the wall framing or soak the end-grain of the bottom plates.
Apply the flexible membrane starting from the exterior face of the wall sheathing, running it up over the sloped sill, forming seamless interior corners without slits, and capping it off over the back dam. Firmly press the membrane into place with a seam roller to activate the pressure-sensitive adhesive and eliminate air pockets.
Integrating with the Water-Resistive Barrier
Waterproofing only works when each layer sheds water over the layer beneath it, following the basic logic of roofing shingles. If a lower flashing layer overlaps an upper layer, it creates a reverse lap that funnels water straight into the structure.
Before the door goes in, the house wrap or fluid-applied weather-resistive barrier (WRB) below the opening must be addressed. Ensure the apron flashing beneath the rough sill laps over the exterior house wrap by at least several inches.
When your sill pan membrane extends over the front edge of the subfloor, it must fold down onto the exterior sheathing, overlapping the apron flashing below. This uninterrupted cascade ensures that moisture falling down the wall or rolling out of the sill pan drops cleanly onto the drainage plane, well away from the foundation connection.
Setting the Door and Protecting Vulnerable Materials
With the sill pan constructed and tied into the drainage plane, the door assembly is ready for installation. However, the final mechanical steps can easily ruin an otherwise perfect waterproofing job if executed carelessly.
First, protect the bottom of the door frame. Exterior door jambs are typically made of finger-jointed pine or composite materials wrapped in thin vinyl. The exposed bottom grain of a wooden jamb acts like a cluster of drinking straws. If submerged in sitting water, it wicks moisture several feet up the frame, causing the exterior brickmould and interior casings to rot. Seal the exposed bottom end-grain of both door jambs with an exterior-grade primer, high-performance epoxy, or marine sealant before setting the unit in place.
Next, apply sealant strategically:
- Apply generous beads of polyurethane sealant along the vertical face of the back dam.
- Lay down beads of sealant where the door threshold will rest inside the sill pan.
- Never caulk the exterior front edge of the threshold closed. Leaving the exterior front seam open—or elevated slightly on plastic leveling shims—is vital. If you seal the outer face of the sill pan, you create a dam that traps moisture inside the pan, turning a drainage system into a holding tank.
Finally, mind your fasteners. Never drive finish nails or structural screws down through the bottom of the threshold into the sill pan. Puncturing the base of the waterproof pan creates instant leak paths directly into the subfloor. Fasten the door frame through the vertical side jambs using structural screws driven into the framing studs, using solid shims behind the hinge and strike locations to prevent frame distortion.
Managing Exterior Clearances
A perfectly installed sill pan can still fail if the surrounding hardscaping does not allow for proper clearance. An exterior door threshold should never sit flush with an unshaded concrete patio, stone terrace, or wooden deck board.
When rain hits a flat concrete slab, it bounces. In heavy downpours, that splashback can easily reach six to eight inches high, driving moisture over the back dam and around the bottom weatherstripping.
Maintain at least a two-to-four-inch step-down from the door threshold to the exterior patio or porch landing. If building codes or accessibility needs require a flush, zero-step entry, you must incorporate a dedicated drainage trench with an architectural grating directly in front of the threshold to swallow surface runoff before it challenges the door assembly.
Treating an exterior door threshold with this level of detail takes patience and quality materials, but the payoff is permanent peace of mind. By establishing a sloped substrate, building a continuous sill pan with robust dams, and respecting the basic laws of drainage, you protect the structural skeleton of the home from the ground up.